 |
||||||||
Card Making Project - Christmas Scene Stepper Card
Made by Madeleine
The great thing about Marianne Design products is that many of the dies are designed to work together so you can mix and match to your hearts content to create cards that are different to everyone else's. It's not just dies in the current releases either - this year's Christmas dies are designed not only to work with last year's best sellers but also with the most popular dies from the year before so you can gradually build up your collection of dies and create cards incorporating old and new.
This stepper card is made in two parts using basic white creased cards - one card for the background scene and another for the stepper part of the card. Then it's just a matter of bringing the two parts together.
You need a die cutting machine to make this card.
|
||||||||
 |
To make this card you will need:
Card and Paper:
Dies
Glues
|
|||||||
Cut a piece off the bottom of each card blanks so that both the card blanks to measure 148mm x 132mm. Turn One of the card blanks so that the crease is at the top - this is the background card.
Take the remaining card blank and score down the middle of the front of the card. This is 74mm from the outside edge or, if you are using the EaziScore, the A4 gatefold line. This is the step card.
Making the Background Card
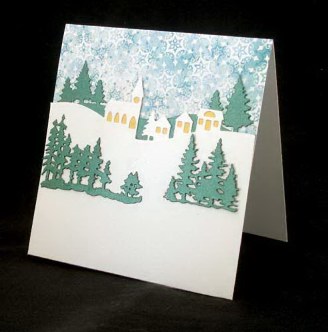 Take a sheet of the snowflake background paper and cut it to 148mm x 132mm. Glue to the card using photo glue.
Cut a piece of the Stardream Emerald card and a piece of the Ice silver card (or, if using, the Stardream Crystal card) to 148mm x 132mm.
Using the Stardream Emerald card and the Horizon Pine Trees die place the die so that the tallest pine tree is about 20mmm from the top of the card (you may want to use a little low tack masking tape to hold the die in place) and run it through the die cutting machine. Glue to the card using photo glue.
Using the Ice Silver (or Stardream Crystal) card and the Horizon Winter Village die place the die so that the top of the church spire is about 30mm from the top of the card and run it through the die cutting machine. Cut small pieces of the Stardream Gold paper and glue to the back of the die cut then glue to the card using photo glue.
Using Stardream Emerald card run the Tiny's Pine Trees dies through the die cutting machine. Adhere the two sets of trees to the card using Pinflair glue making them just slightly 3D - about 1mm - 2mm.
Making the Step Card
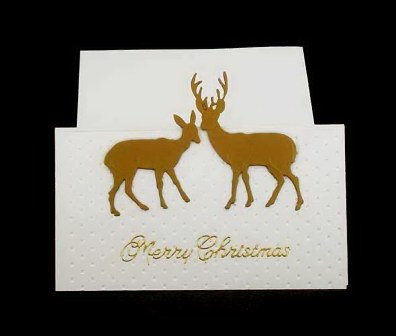 Cut a piece of Ice Silver (or Stardream Crystal card) to 74mm x 132mm. Run it through the die cutting machine using the Swiss Dots folder to add texture. Using photo glue, adhere it to the front of the step with the raised side downwards, i.e. the debossed side should be the side visible on the card.
By gluing the embossed side downwards the snowy dot appearance is still visible but as a debossed rather than embossed finish - this allows the peel off, when applied, to sit flat.
Using Stardream Antique Gold run the Tiny's Deer through the die cutting machine once to cut and then, changing plate, once again to emboss. Attach to the front of the step card using Pinflair glue and adding more glue to the body than the legs to give the 3D effect.
Attach the Merry Christmas peel off.
Combining the 2 Cards to Make the Stepper Card
Using photo glue, glue the front of the background card to the back of the stepper card so that the plain back of the stepper card is behind the front of the background card. Leave to dry.
********************************
Please feel free to copy this card for your own use. Our angel policy can be accessed via the Gallery home page.
______________________________________________________________________________
|
||||||||
|
||||||||